Click the Orthogonal Conduit Tool button ![]() on the toolbar.
on the toolbar.
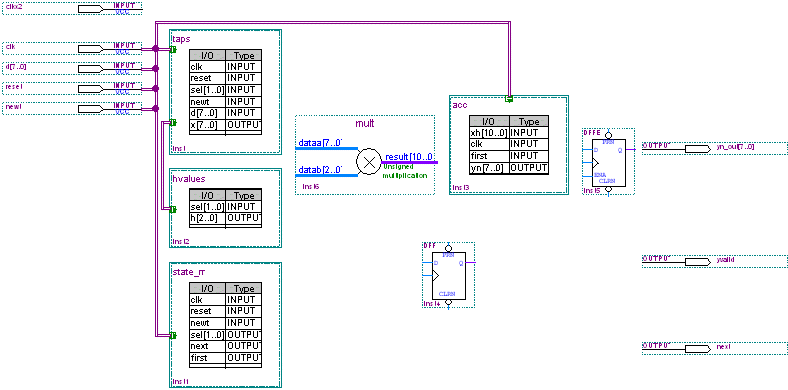
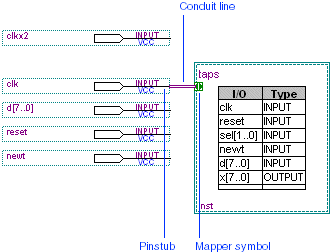
Click the pinstub of the clk input pin to define the start of the conduit, and then drag the pointer to draw a line that connects to the border of the taps block. A "mapper" symbol appears automatically on the edge of the taps block where the conduit connects to the block. A mapper allows you to map I/O port(s) in the block to signal(s) in the conduit. Block mappers are discussed in greater detail later in this tutorial module.
Repeat steps 1 through 2 to make the additional connections between the symbols and blocks shown in the following table.
| To draw a line that connects a node, bus, or conduit to an existing node, bus, or conduit, you can choose the appropriate Orthogonal Node Tool, Orthogonal Bus Tool, or Orthogonal Conduit Tool button on the toolbar. When you draw a line that connects a node, bus, or conduit to an existing node, bus, or conduit, a connection "dot" appears. |
| Draw Conduit From: | To: |
INPUT pin clk |
taps block (already entered) |
Conduit connecting INPUT pin clk to taps
block |
state_m block |
INPUT pin d[7..0] |
Conduit connecting taps block to state_m block |
INPUT pin reset |
Conduit connecting taps block to state_m block |
INPUT pin newt |
Conduit connecting taps block to state_m block |
taps block |
hvalues block |
Conduit connecting INPUT pin clk to taps block |
acc block |