For Printing Purposes Only! |
|
Click the Print icon to print this Module. Click the Done or Previous button when finished. |
ARM-Based Excalibur Module |
The ARM®-based Excalibur™ device family is based on system-on-a-programmable-chip (SOPC) architecture, consisting of an ARM-based Excalibur embedded processor stripe and an APEX™ 20KE programmable logic device (PLD). The stripe contains the ARM processor core, peripherals, and a memory subsystem. This architecture allows the stripe and programmable logic device to be optimized for performance, enabling maximum integration and system cost reductions.
This tutorial guides you through the steps necessary to create and instantiate an ARM-based Excalibur processor megafunction in a design, perform a functional simulation in the Quartus II software, build software code to run on the ARM-based Excalibur embedded processor core, and program an Excalibur device.
| This tutorial assumes you have installed the Altera ARM Developer Suite (ADS) version 1.1 to the c:\program files\arm\adsv1_1\ directory. If you installed ADS in a different drive and/or directory, substitute the appropriate drive and/or directory name when completing this tutorial. In addition, this Advanced tutorial module assumes that you are familiar with the basic functionality of the Quartus II software, as described in the Basic tutorial modules. |
|
The Excalibur tutorial module uses the Altera-provided arm_tutorial project to teach you how to implement designs for an ARM-based Excalibur device. This project, and its associated files, are installed on your computer during the Quartus II installation process.
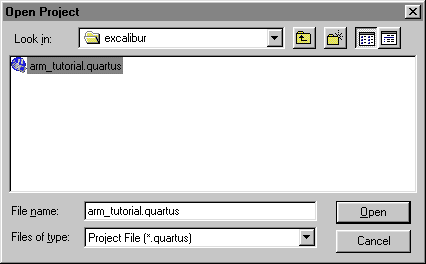
To open the arm_tutorial project, follow these steps:
Choose Open Project (File menu). The Open Project dialog box appears.
In the \qdesigns\excalibur subdirectory, select the Altera-provided arm_tutorial.quartus project file in the File name list.
Click Open.
![]()
|
The stripe portion of the ARM-based Excalibur device contains the ARM processor core, peripherals, and memory subsystem. The dual-port RAM memory and the system bridges support the interface between the stripe and the programmable logic array.
This section describes how to use the MegaWizard® Plug-In Manager (Tools menu) to create a megafunction variation of the ARM-based Excalibur embedded processor megafunction and instantiate it in the top-level design file, arm_top.bdf. The Mega-Wizard Plug-In Manager allows you to create or modify design files that contain custom variations of megafunctions, such as the ARM-based Excalibur embedded processor megafunction. The ARM-Based Excalibur MegaWizard Plug-In helps you to specify options for the embedded processor stripe easily. Once the ARM-Based Excalibur MegaWizard Plug-In generates the embedded processor stripe, you can instantiate it in the design file.
|
To use the ARM-Based Excalibur MegaWizard Plug-In, which is available from the MegaWizard Plug-In Manager (Tools menu), to create the ARM-based Excalibur embedded processor megafunction, follow these steps:
Choose MegaWizard Plug-In Manager (Tools menu). The first page of the MegaWizard Plug-In Manager appears.
![]()
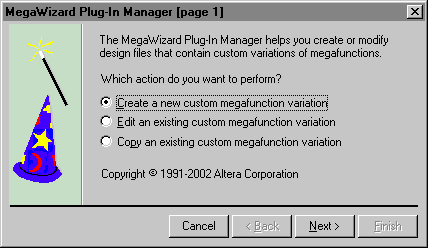
In the first page of the MegaWizard Plug-In Manager, make sure Create a new custom megafunction variation is selected and click Next.
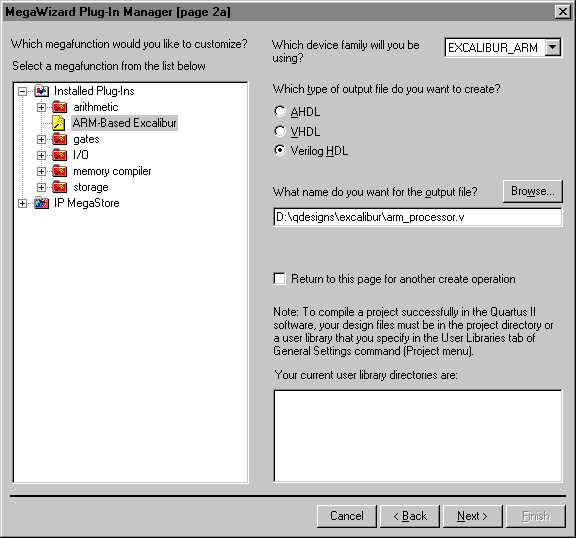
Under Which megafunction would you like to customize?, select ARM-Based Excalibur.
Specify the following responses to the remaining wizard prompts:
| Wizard Prompt: |
Response: |
| Which device family will you be using? | EXCALIBUR_ARM |
| Which type of output file do you want to create? | Verilog HDL |
| What name do you want for the output file? | d:\qdesigns\excalibur\arm_processor.v |
![]()
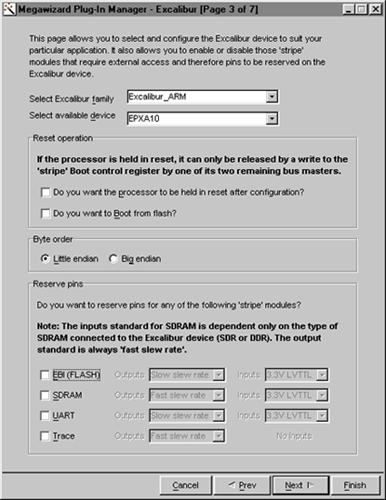
Click Next. MegaWizard Plug-In Manager - Excalibur [Page 3 of 7] appears.
|
To specify ARM-based Excalibur device options, follow these steps:
In MegaWizard Plug-In Manager - Excalibur page 3, specify the following responses to the wizard prompts:
| Wizard Prompt: |
Response: |
| Select Excalibur family | Make sure Excalibur_ARM is selected. |
| Select available device | Make sure EPXA10 is selected. |
| Reset Operation | Make sure both options are turned off. |
| Byte order | Make sure Little endian is selected. |
| Reserve pins | Make sure all options are turned off. |

Click Next. MegaWizard Plug-In Manager - Excalibur [Page 4 of 7] appears.
|
The PLD-TO-STRIPE and STRIPE-TO-PLD bridges allows the PLD to access resources in the stripe and allows the stripe to access resources in the PLD.
To configure the interface between the stripe and the PLD, follow these steps:
In MegaWizard Plug-In Manager - Excalibur page 4, specify the following responses to the wizard prompts:
| Wizard Prompt: |
Response: |
| Bridges | Make sure Do you want to use the STRIPE-TO-PLD bridge (Master Port)? is turned on, and turn off Do you want to use the PLD-TO-STRIPE bridge (Slave Port)?. |
| Interrupts | Make sure both options are turned off. |
| Trace / Debug | Make sure Do you want to use processor debug extensions? is turned off. |

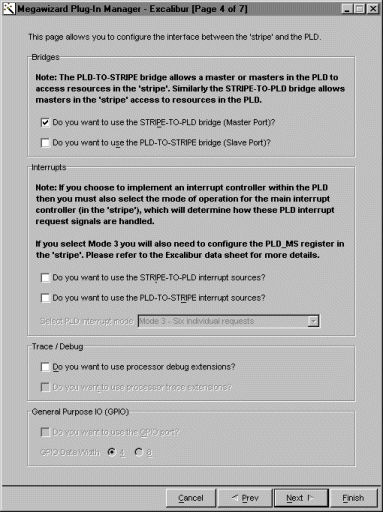
Click Next. MegaWizard Plug-In Manager - Excalibur [Page 5 of 7] appears.
|
To configure the clocks for the stripe, follow these steps:
In the MegaWizard Plug-In Manager - Excalibur page 5, specify the following responses to the wizard prompts:
| Wizard Prompt: |
Response: |
| External clock reference | Enter 50 MHz. |
| AHB1 / AHB2 clock settings | Make sure Bypass PLL1 is turned on. Make sure 25.00000 MHz is selected in the Select AHB1 frequency list and that 12.50000 MHz is selected in the Select AHB2 frequency list. |
| Serial Programming | Turn off Are you using a serial EEPROM configuration device?. Make sure 10 is specified in the Enter your programming frequency box. |

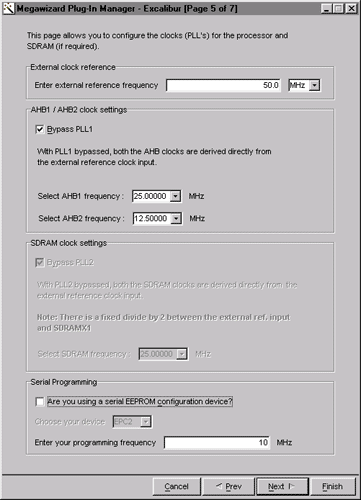
Click Next. MegaWizard Plug-In Manager - Excalibur [Page 6 of 7] appears.
|
To configure the memory map of the Excalibur device, follow these steps:
In MegaWizard Plug-In Manager - Excalibur page 6, specify the following responses to the wizard prompts:
| Wizard Prompt: |
Response: |
| Registers | Make sure 7FFFC000 is specified as the base address and 16K is selected in the size list. |
| SRAM0 | Make sure 00000000 is specified as the base address and 128K is selected in the size list. |
| SRAM1 | Make sure 00020000 is specified as the base address and 128K is selected in the size list. |
| PLD0 | Type 10000000 as the base address and select 16K in the size list. Make sure Prefetch is turned off under PLD0 settings. |
| Memory map | Make sure all other options are turned off. |

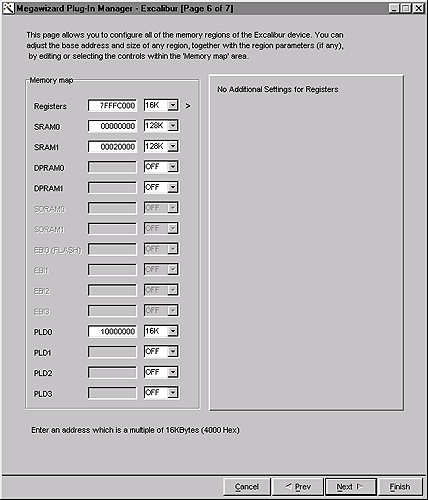
Click Next. MegaWizard Plug-In Manager - Excalibur [Page 7 of 7] appears. This page lists the files that are created in the project directory for the megafunction.
![]()
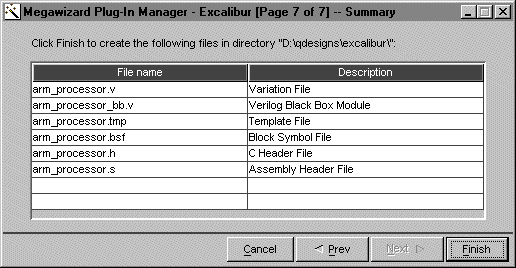
Click Finish to create the ARM-based Excalibur embedded processor megafunction.
|
Once you have created the ARM-based Excalibur embedded processor megafunction, you can then instantiate it in the Altera-provided top-level arm_top.bdf design file and connect it to the other elements of the design. Next, you can perform analysis and elaboration on the design in preparation for performing a bus functional simulation of the design.
|
The top-level arm_top Block Design File is installed in the \qdesigns\excalibur directory during the installation process. This file contains the pld_slave logic block that you in turn connect to the Master Port of the arm_processor megafunction. The pld_slave logic block is a slave in the PLD portion of the device that performs addition, subtraction, or multiplication based on the values written to its registers by the Master Port.
To open the arm_top.bdf file:
Choose Open (File menu). The Open dialog box appears.
In the Files of type list, select Graphic Files.
In the \qdesigns\excalibur subdirectory, select the arm_top.bdf file.
Click Open.
![]()

|
To instantiate the arm_processor symbol generated by the MegaWizard Plug-In Manager in the top-level design, follow these steps:
Double-click an empty space in the Block Editor window. The Symbol dialog box appears automatically.
In the Libraries list, click the + icon to expand the Project list.
In the Project list, select the arm_processor symbol. A preview of the newly created arm_processor megafunction appears in the Symbol dialog box.
![]()
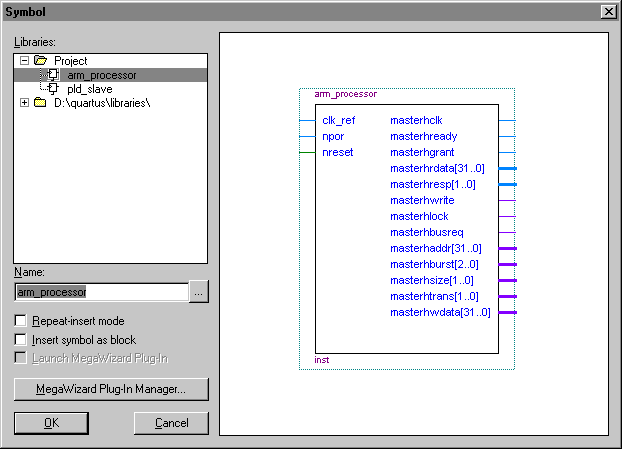
Click OK to instantiate the arm_processor symbol in the BDF. An outline of the arm_processor symbol is attached to the pointer.
To place the symbol, click to the right of the clk_ref and npor INPUT pins in the Block Editor window. The arm_processor symbol is instantiated in the BDF as shown in the following illustration.
![]()
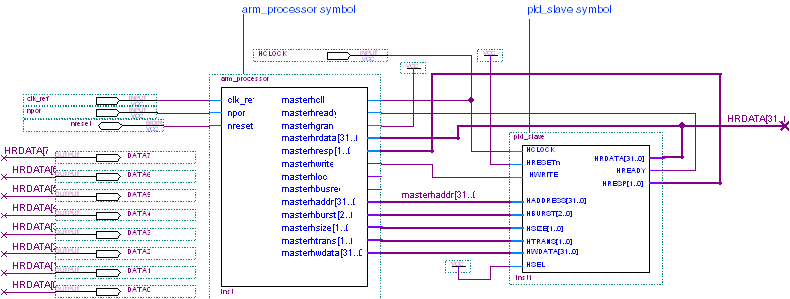
For simplicity, ports are arranged on the arm_processor symbol according to their stripe function. |
|
After instantiating the arm_processor symbol, you must connect the appropriate ports. To connect the ports of the arm_processor symbol to appropriate node and bus lines, position the symbol so that the following connections are made:
| Connection from arm_processor Port: | Connect To: |
INPUT pin clk_ref |
clk_ref input port of arm_processor symbol |
INPUT pin npor |
npor input port of arm_processor symbol |
BIDIR pin nreset |
nreset bidirectional port of arm_processor symbol |
masterhclk input port of arm_processor symbol |
Node line connecting INPUT pin HCLOCK to HCLOCK input port of pld_slave symbol |
masterhready input port of arm_processor symbol |
HREADY output port of pld_slave symbol |
masterhgrant input port of arm_processor symbol |
Node line connected to VCC symbol |
masterhrdata[31..0] input port of arm_processor symbol |
Conduit connecting the HRDATA[31..0] output port of pld_slave symbol to the HRDATA[31..0] output bus |
masterhresp[1..0] input port of arm_processor symbol |
HRESP[1..0] output port of pld_slave symbol |
|
Continue to connect the ports of the arm_processor symbol to appropriate node and bus lines, by positioning the symbol so that the following connections are made:
| Connection from arm_processor Port: | Connect To: | masterhwrite output port of arm_processor symbol |
HWRITE input port of pld_slave symbol |
masterhaddr[31..0] output port of arm_processor symbol |
HADDRESS[31..0] input port of pld_slave symbol |
masterhburst[2..0] output port of arm_processor symbol |
HBURST[2..0] input port of pld_slave symbol |
masterhsize[1..0] output port of arm_processor symbol |
HSIZE[1..0] input port of pld_slave symbol |
masterhhtrans[1..0] output port of arm_processor symbol |
HTRANS[1..0] input port of pld_slave symbol |
masterhwdata[31..0] output port of arm_processor symbol |
HWDATA[31..0] input port of pld_slave symbol |
![]()
Choose Save (File menu).
|
Before performing a functional simulation of the design, you must perform analysis and elaboration on the design. During analysis and elaboration, the Compiler submits the design to the database builder, which analyzes the design files for syntax and semantic errors, and extrapolates the hierarchy in the instances of each logic block in the design. To perform analysis and elaboration, follow these steps:
Choose Start > Start Analysis & Elaboration (Processing menu). The Compiler analyzes the design.
When you receive a message indicating that analysis and elaboration was successful, click OK.
|
You can perform a functional simulation of an Excalibur design before compilation and synthesis in the Quartus II software. To do this, you must first generate an uPCore Transaction Model Input File (.mbus_in) that describes the embedded processor bus transactions over the Stripe-To-PLD Bridge via the Stripe Master Port. You can then use the Quartus II Simulator, in addition to the bus functional model, to perform a functional simulation of the design and generate an uPCore Transaction Model Output File (.mbus_out) that lists the bus transactions between the PLD and the stripe.
|
An uPCore Transaction Model Input File (with the extension .mbus_in) is used to simulate AMBA AHB bus transactions in order to verify the functionality of slaves implemented in the PLD portion of an ARM-based Excalibur device. The Simulator uses the uPCore Transaction Model Input File data to simulate the interactions between the Stripe-To-PLD bridge and the PLD slave.
To create an uPCore Transaction Model Input File, you must first create a Master Port High-Level Command File (.dat) that describes the read, write, wrapping, and incremental burst operations, as well as busy and idle transactions and periods of idleness that are initiated by the embedded processor core and directed to the PLD. You can then use the exc_bus_translate utility to generate the uPCore Transaction Model Input File that can be processed by the Simulator.
To use the Altera-provided input.dat Master Port High-Level Command File, which is located in the \qdesigns\excalibur directory, to create the uPCore Transaction Model Input File, follow these steps:
Open a DOS or UNIX command prompt.
To change to the appropriate project subdirectory:
Type the following commands at a DOS command prompt:
|
Type the following command at a UNIX command prompt:
|
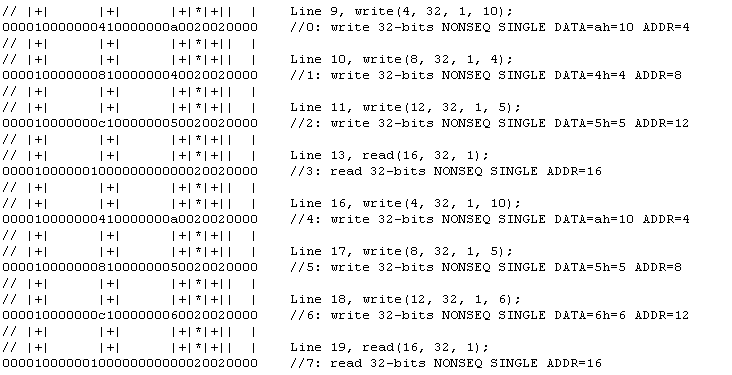
To use the exc_bus_translate utility to process the input.dat file and generate the arm_top.mbus_in file, type the following command at the command prompt:
exc_bus_translate input.dat arm_top.mbus_in![]()
Refer to the following illustration for an excerpt from the generated arm_top.mbus_in file:
![]()
Close the DOS or UNIX command prompt.
|
To specify Simulator settings for performing a functional simulation, follow these steps:
Choose Settings (Assignments menu).
![]()
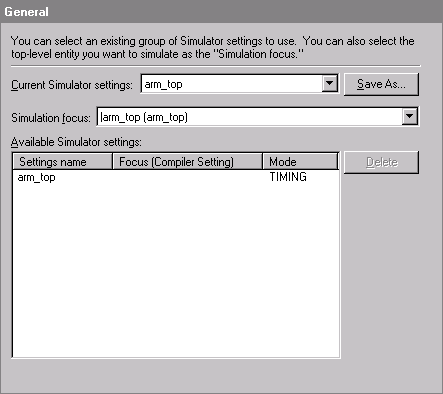
In the Category list, select Mode under Simulator Settings.
In the Simulation mode list, select Functional. A description of functional simulation appears in the Description field.
![]()

In the Category list, select Options under Simulator Settings.
Make sure Simulation coverage reporting is turned on.
In the uPCore Transaction Model File Name box, type arm_top or click Browse (...) to select the arm_top.mbus_in file. The Simulator uses this file to simulate the interactions between the Stripe-To-PLD bridge and the PLD slave.
![]()

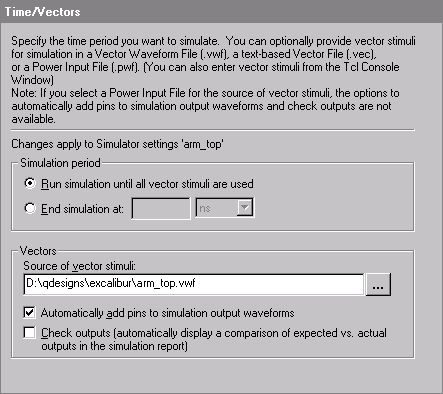
In the Category list, select Time/Vectors under Simulator Settings.
Under Simulation period, make sure Run simulation until all vector stimuli are used is selected.
Under Vectors, in the Source of vector stimuli box, type D:\qdesigns\excalibur\arm_top.vwf, or click Browse (...) to select the file. The arm_top.vwf file contains the input and output vectors required for functional simulation.
Make sure Automatically add pins to simulation output waveforms is turned on.
![]()
Click OK.
|
To run a bus functional model functional simulation, follow these steps:
Choose Run Simulation (Processing menu).
The Simulator immediately begins to simulate the arm_top top-level design entity and all of its subordinate design entities, using the arm_top Simulator settings and the arm_top.vwf vector source file. It also generates the uPCore Transaction Model Output File, arm_top.mbus_out, which contains the bus transactions (that is, read and write operations) that occur between the PLD and the Stripe Master Port during simulation.
When you receive a message indicating that simulation was successful, click OK to close the message box.
|
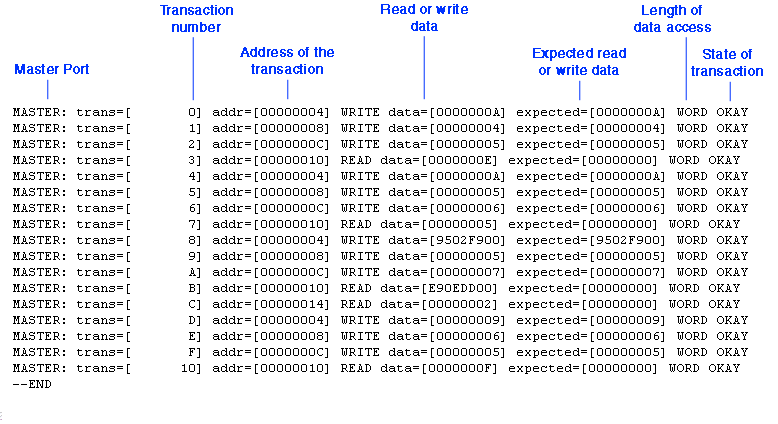
An uPCore Transaction Model Output File (with the extension .mbus_out) is generated by the Simulator when you simulate a design that contains an ARM-based Excalibur embedded processor core and you specified an upCore Transaction Model Input File. This file shows the results of the bus functional model simulation.
The uPCore Transaction Model Output File contains the port names (Master Port or Slave Port), the transaction numbers, the addresses where the data is written, the actual and expected data, the length of data access and the state of the transaction.
To view the arm_top.mbus_out file, follow these steps:
Choose Open (File menu).
In the Files of type list, select All Files.
In the \qdesigns\excalibur\ subdirectoy, select the arm_top.mbus_out file.
Click Open.
![]()
To close the arm_top.mbus_out file, choose Close (File menu).
|
This section guides you as you compile the design and generate a programmable logic Partial SRAM Object File (.psof). The PSOF is combined with the application software HEX File to generate the appropriate configuration files for the ARM-based Excalibur device.
To compile the arm_top design entity, follow these steps:
Choose Start Compilation (Processing menu).
The Compiler immediately begins to compile the arm_top design entity, and all of its subordinate design entities, using the existing arm_top Compiler settings. This compilation may require 15 minutes or more, depending on your system.
If you receive a message indicating that compilation was successful and there are no errors or warnings displayed in the Messages window, click OK to close the message box.
| You should correct any errors in your design and recompile it until it is error-free before proceeding with the tutorial. If the Compiler displays any error messages in the Messages window, select the message and choose Locate (right button pop-up menu) to find its source(s), and/or choose Help (right button pop-up menu) to display help on the message. |
|
This section teaches you how to use the Software Build Settings Wizard (Assignments menu) to specify the software build settings for the design. When you create a new project, the Quartus II software creates two default software build settings called Debug and Release, and uses the Debug software build settings as the current software build settings. You can also modify the existing software build settings by using the Settings command (Assignments menu).
The Quartus II software uses the software build settings you specify to perform a software build to create files for an Excalibur embedded processor core. The Quartus II software uses software source files to create a HEX File. The Quartus II software combines the HEX File and PSOF you created during compilation to generate a SOF. You can then use the resulting SOF, which contains the data for configuring a device, to configure an ARM-based Excalibur device using the Quartus II Programmer.
|
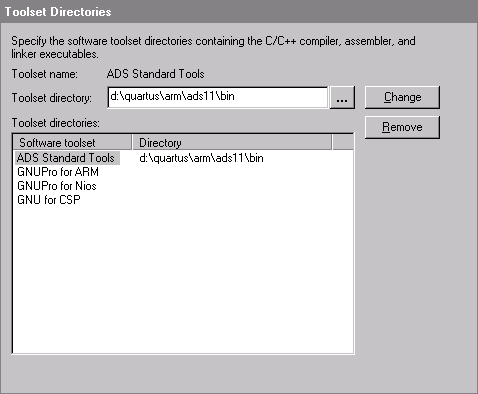
To perform the software build, you must have installed the ARM Developer Suite (ADS) software version 1.1. The software toolset setting in the Quartus II software specifies the location of the executables for a C/C++ compiler, assembler, and linker, which the Quartus II software uses when performing a software build.
To specify the location of the software toolset, follow these steps:
Choose Settings (Assignments menu).
In the Toolset directories list, select ADS Standard Tools.
In the Toolset directory box, type c:\program files\arm\adsv1_1\bin as the path to the ADS directory or click Browse (...) select the directory.
Click Change.
![]()
Click OK.
|
The CPU options of the Software Build Settings Wizard (Assignments menu) allow you to specify the embedded processor core, software toolset, and command-line commands you want the Software Builder to use. The CPU options also allow you to specify the type, name, and byte order of the output file that the Software Builder generates, and whether you want the Software Builder to use an output HEX File with a file that contains PLD configuration data to generate configuration files.
To specify the software toolset and options for the Excalibur embedded processor core, follow these steps:
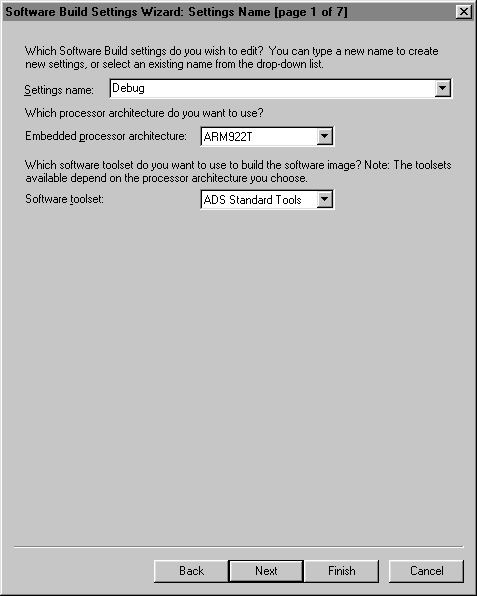
Choose Software Build Settings Wizard (Assignments menu). The Introduction page appears.
Click Next. Software Build Settings Wizard: Settings Name [page 1 of 7] appears.
Specify the following responses to the wizard prompts:
| Wizard Prompt: |
Response: |
| Settings name | Select Debug. |
| Embedded processor architecture | Make sure ARM922T is selected. |
| Software toolset | Select ADS Standard Tools. |

Click Next. Software Build Settings Wizard: Byte order and output [page 2b of 7] appears.
Specify the following responses to the wizard prompts:
| Wizard Prompt: |
Response: |
| What is the byte order? | Make sure Little endian is selected. |
| Which format do you want the output file to have? | Make sure Hexadecimal (Intel-Format) File (.hex) is selected. |
| What is the name of the output file? |
Make sure |
| Do you want to run a post-build command line at the end of the software build? | Make sure No is selected. |
| The Quartus II software automatically places all generated software build files (including arm_tutorial.hex) in a directory with the same name as the current software build settings, that is, Debug. |

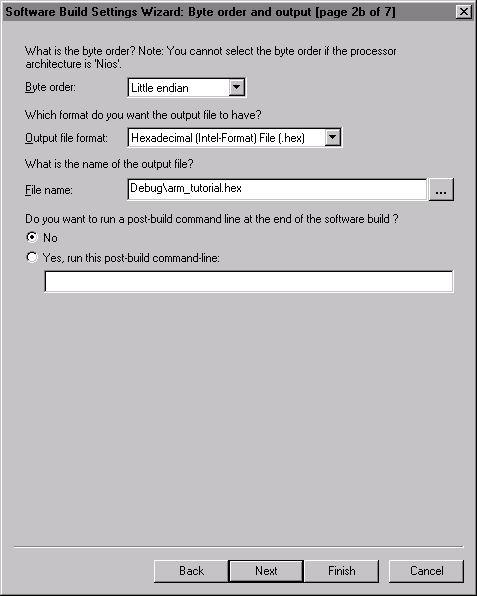
Click Next. Software Build Settings Wizard: Programming File Generation [page 3 of 7] appears.
Under Which type of programming file do you wish to create? select the file type for the passive configuration scheme and type arm_top.psof in the File name box.

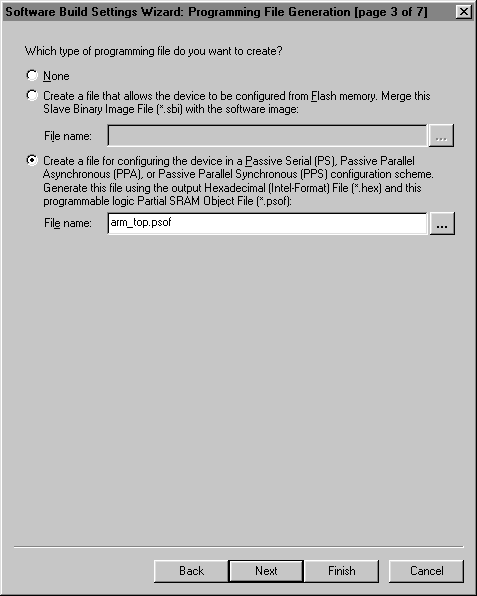
Click Next. Software Build Settings Wizard: C/C++ Compiler [page 4a of 7] appears.
|
The C/C++ compiler options of the Software Build Settings Wizard allow you to specify the optimization level and goal, preprocessor definitions, include directories, and command-line options for a software toolset C/C++ compiler to use during a software build. The C/C++ compiler options also allow you to specify whether you want the C/C++ compiler to ignore standard include directories, generate debug information, or suppress warning during the software build.
To specify the options for the C/C++ compiler, follow these steps:
In the Software Build Settings Wizard: C/C++ Compiler page 4a, specify the following responses to the wizard prompts:
| Wizard Prompt: |
Response: |
| What level of optimization do you want? | Make sure Low is selected. |
| What is your optimization goal? | Make sure Minimize size is selected. |
| Do you want to include any preprocessor definitions when the C/C++ compiler is running? | Make sure No is selected. |
| Do you want the C/C++ compiler to search any additional directories for Include Files (.h)? | Make sure No is selected. |
| Select additional C/C++ compiler options | Make sure Generate debug information is turned on and Suppress warnings is turned off. |

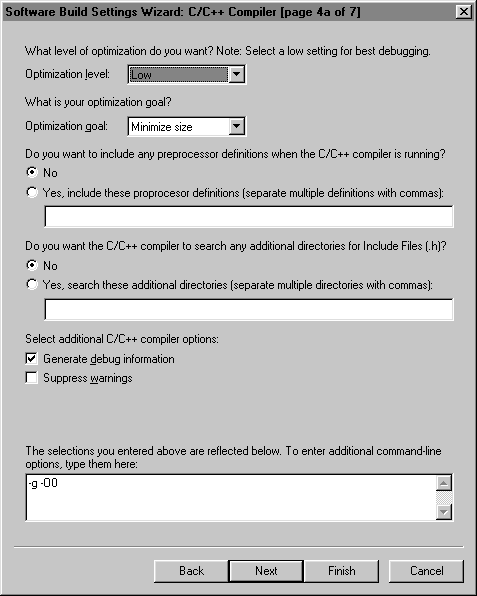
Click Next. Software Build Settings Wizard: Assembler [page 5 of 7] appears.
|
The Assembler options of the Software Build Settings Wizard allow you to specify preprocessor definitions, include directories, and command-line options for a software toolset assembler to use during a software build. These options also allow you to specify whether you want the assembler to generate debug information, keep local symbols, suppress warnings, or use a C preprocessor during a software build.
To specify the Assembler options, follow these steps:
In the Software Build Settings Wizard: Assembler page 5, specify the following responses to the wizard prompts:
| Wizard Prompt: |
Response: |
| Do you want to include any preprocessor definitions when the assembler is running? | Make sure No is selected. |
| Do you want the assembler to search any additional directories for Include Files (.h)? | Make sure No is selected. |
| Select additional assembler options | Make sure Generate debug information and Keep local symbols in symbol table are turned on and Suppress warnings is turned off. |

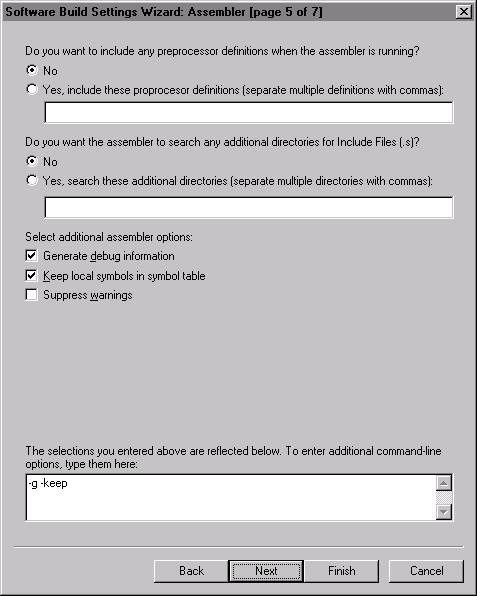
Click Next. Software Build Settings Wizard: Linker [page 6 of 7] appears.
|
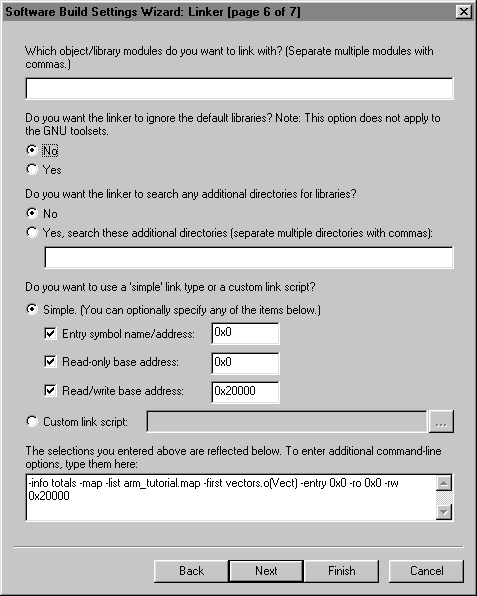
The Linker options of the Software Build Settings Wizard allow you to specify the object files, Library Files (.a), library directories, link type, and command-line options for a software toolset linker to use during a software build.
To specify the Linker options, follow these steps:
In the Software Build Settings Wizard: Linker page 6, specify the following responses to the wizard prompts:
| Wizard Prompt: |
Response: |
| Do you want the linker to ignore the default libraries? | Make sure No is selected. |
| Do you want the linker to search any additional directories for libraries? | Make sure No is selected. |
| Do you want to use a 'simple' link or a custom link script? | Make sure Simple is selected. Turn on Entry symbol name/address and specify 0x0 in the box as the address. Turn on Read-only base address and specify 0x0 in the box as the address. Turn on Read/write base address and specify 0x20000 in the box as the address. |
| Additional command line options | Before the existing commands, add |

Click Next. Software Build Settings Wizard: Summary [page 7 of 7] appears.

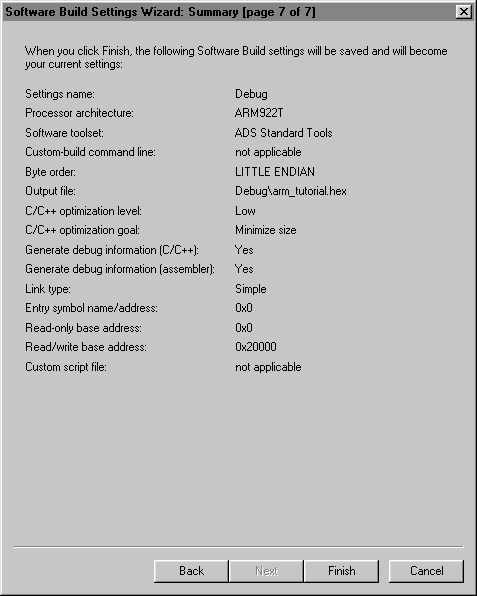
Click Finish to close the wizard and save the software build settings
|
The Quartus II software uses software source files to create a HEX File that contains the memory initialization data. The Quartus II software then uses the HEX File and the PSOF created during compilation to generate passive programming files, including a SOF.
To add the Altera-provided software source files to the project, follow these steps:
Choose Add/Remove Files in Project (Project menu). The Add/Remove page of the Settingsdialog box appears.
Click Browse (...). The Select File dialog box appears.
In the Files of type list, select Software Files.
In the \qdesigns\excalibur\arm_c\ subdirectory, select the arm_tutorial.c file.
Click Open. The file arm_tutorial.c appears in the File name list.
Repeat steps 5 and 6 above to add the following software source files to the project:
| File name |
Description |
| init.s | Assembly File (.s) that contains initialization data for arm_tutorial.c. |
| vector.s | Assembly File that contains initialization data for arm_tutorial.c |
![]()
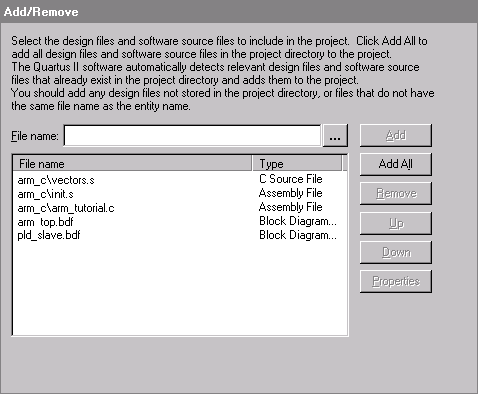
Click OK. You have now added all the necessary software source files required to run the software build.
|
You can use the Start Software Build command to compile, build and link the software source files. The Quartus II makeprogfile utility then combines the resulting HEX File with the PSOF to create a SOF. You can then use the SOF to configure an ARM-based Excalibur device.
To start the software build, follow these steps:
Choose Start Software Build (Processing menu).
If you receive a message indicating that the software build was successful and there are no errors displayed in the Messages window, click OK to close the message box.
| You should correct any errors in your design and perform the software build again until it is error-free before proceeding with the tutorial. If the Software Builder displays any error messages in the Messages window, select the message and choose Locate (right button pop-up menu) to find its source(s), and/or choose Help (right button pop-up menu) to display help on the message. |
|
After a successful compilation and software build, the Quartus II software generates one or more programming files that the Programmer can use to program or configure a device. This tutorial section describes downloading configuration data into an ARM-based Excalibur device through the MasterBlaster communication cable.
Before configuring a device, you must open the Programmer and create a Chain Description File (.cdf) that stores device name, device order, and programming and hardware setup information. You can use the CDF to configure an ARM-based Excalibur device in a Passive Serial chain.
|
To open the Programmer window and create a CDF, follow these steps:
Choose New (File menu). The Device Design Files tab of the New dialog box appears automatically.
Click the Other Files tab.
In the Other Files tab, select Chain Description File.
To create the CDF, click OK. The Programmer window opens with a blank CDF.
![]()

Choose Save As (File menu). The Save As dialog box appears.
Type arm_top.cdf in the File name box.
In the Save as type list, make sure that Chain Description File is selected.
Click Save.
|
To set up configuration for a single device in a Passive Serial chain, follow these steps:
In the Mode list of the Programmer window, make sure JTAG is selected.
Under Programming Hardware, click Setup. The Hardware Setup dialog box appears.
Click Add Hardware. The Add Hardware dialog box appears.
In the Hardware Type list, select MasterBlaster and, if necessary, select a port in the Port list.
Click OK.
In the Hardware Setup dialog box, click Close.
Click Add File. The Select Programming File dialog box appears.
In the \qdesigns\excalibur\ subdirectory, select the arm_top.sof file.
Click Open.
In the programming list, turn on Program / Configure.
![]()
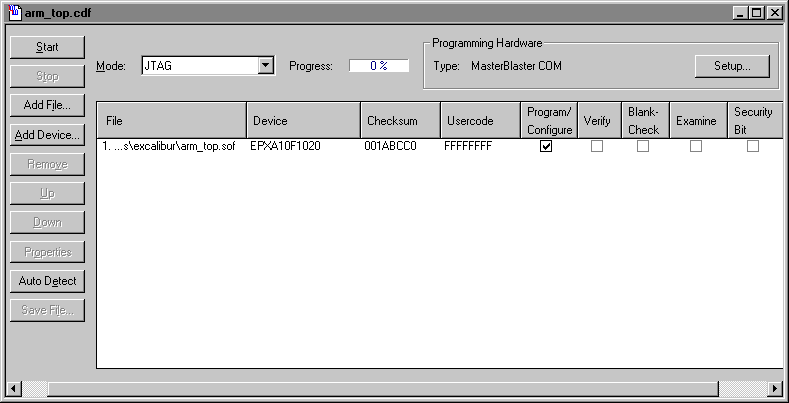
Choose Save (File menu).
| If you want to program multiple devices, you can repeat steps 7 through 10 to add additional devices. However, for the purposes of this tutorial, only one programming file is necessary. |
|
To configure the device(s), follow these steps:
To program with a MasterBlaster download cable, attach the MasterBlaster cable to an RS-232 cable connected to a serial RS-232 port on the PC or UNIX workstation.
Connect the 16-pin female header end of the cable to the 16-pin male MasterBlaster port, and the 10-pin female end of the cable to the 10-pin male header on the target printed circuit board.
Click Start in the Programmer window. When you receive a message indicating that the configuration is complete, click OK.
| Refer to the Quartus II Installation & Licensing for PCs manual or the Quartus II Installation & Licensing for UNIX and Linux Workstations manual for more information about setting up programming hardware. |
|